We all know that using the right tool for the job is essential to a stress-free repair. But, trying to find said tool can be easier said than done. If you’ve recently come across an internal pipe wrench or a job that might call for one, here’s what you need to know.
What Is An Internal Pipe Wrench And When Will I Need One?
Also called a nipple extractor, an internal pipe wrench shines in the world of rusty plumbing. Take this scenario, for example: You’re trying to remove an old shower pipe, but as you work to do so, you end up breaking it off at the wall. What are you to do?
If you have needle nose
Just twist the nipple extractor and you’ll be able to remove the old pipe from the wall — no need to struggle with
Ideal for removing broken threaded pipe ends, plugs and fittings without marring, scratching, or denting pipe surface or threads.
The machined and heat-treated cams easily grab on to broken pipe fragments lodged inside the other pipe
How To Use An Internal Pipe Wrench
If you think an internal pipe wrench sounds stupidly simple to use, you’d be right. This isn’t rocket science! When it comes to rusty fittings and other scenarios where you need to remove a pipe that’s flush against a wall or floor, a nipple extractor is the easy, go-to solution.
You just need to follow these steps to do things correctly and you’ll be well on your way to a quick, effortless plumbing job that makes you look like a professional.
Tools And Materials Needed
Along with a nipple extractor, you will need a means of turning this handy tool. This is easiest done with the help of an adjustable wrench. Together you’ll need:
- Internal pipe wrench
- Adjustable wrench
1. Determine The Size Of The Fitting
Before you buy an internal pipe wrench you want to determine the size of the pipe you are working with. So, examine the portion of the fitting that has been broken and you’ll be able to determine the size of the necessary tool. It’s as simple as measuring the diameter of the fitting or pipe.
If you cannot easily measure the diameter of the pipe, you can try measuring with the “string technique” demonstrated in this video:
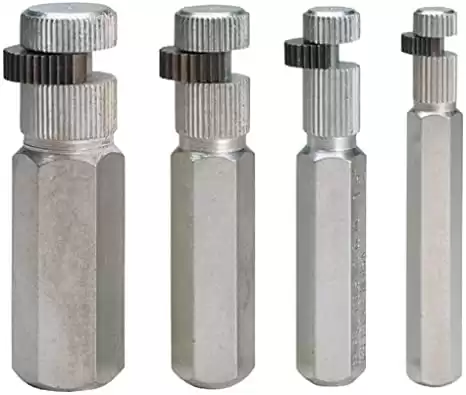
Now you can purchase a single wrench for the diameter you’re working with or, if you think you’ll need variety (or just want to add to your tool stack), you can get a complete set of internal pipe wrenches in varying sizes.
Used to install or extract 1-inch through 2-inch diameter nipples.
Also designed to hold closet spuds and bath, basin and sink strainers through 2-inches.
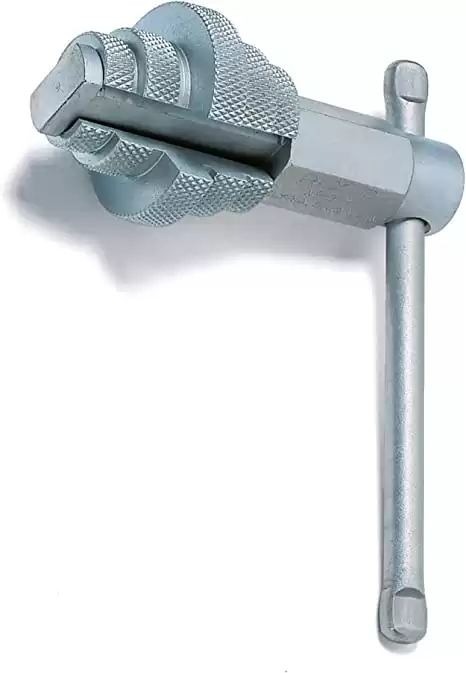
2. Clamp The Internal Pipe Wrench
Now that you’re ready with your internal pipe wrench in hand, you need to insert the solid end into the mouth of an adjustable wrench and clamp that onto the nipple extractor.
Make sure you place it high enough that you can grip it well while being able to twist the wrench around with ease. You might need to play with the placement a bit to get it just right.
3. Insert The Internal Pipe Wrench
Once you have your nipple extractor placed securely into the mouth of your adjustable wrench, it’s time to put it into your broken pipe or fitting. You’ll need to wiggle it around a bit to make sure you get a good grip inside the fitting. Once inside, it should catch on the grooves.
4. Twist To The Left
Remember, righty tighty, lefty loosey. To get the fitting or pipe out of its socket, you usually need to turn it counterclockwise. However, the old rule doesn’t always hold true. On rare occasions, some fittings are reverse-thread and will only loosen if you turn them clockwise but start by turning to the left and see what happens.
The rotating cam head of the nipple extractor has teeth that will easily grab on the inside walls of the pipe when you start turning the wrench.
You’ll want to twist things slowly and steadily, otherwise the internal pipe wrench may get dislodged. If that happens, just reset it so you have a good grip again. Eventually, you’ll be able to release the remaining portion of the pipe or fitting and remove it from the wall or floor where it was stuck. Done!
Conclusion
And that’s it, the internal pipe wrench is a piece of plumbing ingenuity! You’ve got yourself a new tool that is perfect for installing and removing pipe nipples without marring, scratching or denting the pipe surface. And the best part is for a few dollars you will save a pricey call to a plumber!
Happy Plumbing!

Recommended Reading
How To Unclog A Toilet With Or Without A Plunger
We will show you how to quickly unclog a toilet with a plunger and 11 clever ways to clear a toilet if you don't have a plunger handy.
How To Winterize Your Sprinkler System And Prevent It From Freezing
We answer all your questions and show you 7 simple steps on how to blow out your sprinkler system and get it ready for winter!
Plumbing Services: What’s This Going To Cost Me?
The one question you ask before you hire a plumber is, how much is this going to cost? Learn the types of plumbing services and how they affect your wallet.
How To Winterize Your Outdoor Faucets
Winterizing your outdoor faucets properly can be done quickly and save you from a frozen plumbing problems later on. We will show you how!
The Best Toilet Plungers You Can Buy In 2021
Save frustration and embarrassment with our guide on the best toilet plunger you can buy. We will even show you how professionals unclog toilets!
How To Fix Water Hammer And Protect Your Pipes
The quiet whoosh of water through your home’s pipes flows gently, then BANG! We will show you how to silence water hammer and it's damaging effects.