Nothing ruins your fun in the sun or puts a stop to your outdoor chores faster than a busted or leaking garden hose.
A pierced or torn
Quality
What Causes Leaky Garden Hoses ?
Long days watering the lawn, washing your car, and frolicking in the sprinkler can leave your hose a little worse for wear. You literally work a hose hard and put it away wet.
Garden hoses wear out by being pulled across rough surfaces like gravel and concrete driveways or pinched against sharp objects like metal downspouts or around the corners of your home.
All of this stretching, bending, scraping, and sometimes being run over by your car (whoops!) can leave your
Tools And Materials Needed
All that’s required for this outdoor DIY repair is some common hand tools:
- Screwdriver
- Tubing cutter, Sharp utility knife, or a Strong pair of scissors
- Liquid soap
A garden hose that leaks is both an annoyance and a waste of water.
The good news is that repairing it can be done in about five minutes with a garden hose repair kit. Hose repair kits come as male or female threaded hose ends as well as a connector for fixing a leak in the middle of a hose.
How To
The first step to fixing a
Next, you have to determine the size of your hose. Not length, diameter. Some
The most common size of garden hose is 5/8 inch but you can find hoses with 1/2 or 3/4 inch diameters. You can measure your hose by cutting off the broken end with a sharp knife or tubing cutters and measure across the round exposed end with a tape measure.
Remember to measure the distance inside the hose. Think of it like measuring the hole in a doughnut not the doughnut itself, mmmm doughnuts!
Repair a Garden Hose Leaking From The End
If you are experiencing leaking or spraying from the hose ends you are most likely in need of a new washer. The end of the hose that connects to your
All you need is a replacement rubber washer and a small screwdriver. The small
You can also find these rubber washers inside handheld sprayers, sprinklers, and other hose attachments. So it’s a good idea to change these gaskets periodically to prevent leaks at each end of your hose.

Heavy-duty replacement washers.
Soft, Flexible, Pliable, Donut shape conforms to all Hose connections to ensure a watertight seal.
Repair A Garden Hose Leaking From The Hose
Perforated with pinholes or sliced from being run over with a lawnmower, makes it look like you have a child’s sprinkler toy in your hands instead of your trusty garden hose.
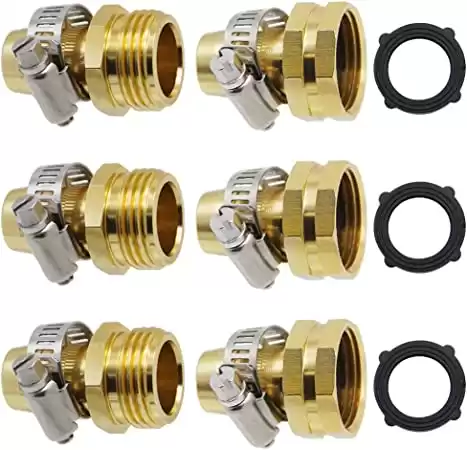
You will need to cut out that damaged section and splice your hose back together with a coupling. You can find hose couplings with barbed connections and gear clamps or in a compression style fitting.
We prefer compression style fittings to couple
To install a
Pinpoint The Pinhole
If you only have a single pinhole to repair, cut the hose directly at that location and install your coupling. No need to make your
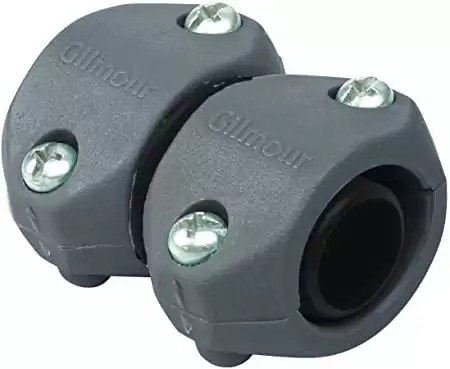
Save the cost of a new hose with Gilmour hose menders and couplings. They are leakproof, rustproof, unbreakable, reusable and easy to use!
Repair A Garden Hose With A Damaged End
Sometimes the end of your
Luckily hose ends are simple to change. The hose end with exposed threads is called the male end and the end with internal threads is called the female end. Makes sense, right?

Barbed Hose Fittings
With the
Trim off the damaged end as close to the brass head as you can. No need to make the
Next, slip the barbed hose end into the cut off
The one drawback to using gear clamps to replace a damaged garden hose end is the exposed tail from the gear clamp. It can snag on clothes or even cut your hands if you’re not careful. But a few wraps of duct tape will secure the gear clamp tail out of the way. Gorilla tape for the win!
Compression Hose Fittings
A more expensive alternative without the pesky gear clamp is compression style hose ends. These compression fittings are made of brass, zinc, or stainless steel and simply pinch the new hose end in place. These
These compression

Save the cost of a new garden hose with hose menders and couplings.
Premium construction for maximum strength and durability. Made from quality Zinc and aluminum alloy. They are leakproof, rustproof, unbreakable, reusable and easy to use.
Conclusion
No more wimpy hose pressure or wasted water. For a few dollars, you fixed that
Happy Plumbing!

Recommended Reading
How To Unclog Your Bathtub Drain The Easy Way
Learn how to easily unclog your bathtub drain in 6 simple steps. Follow this guide and you'll be back to soaking in your tub in no time!
How To Relight Your Water Heater’s Pilot Light
Nothing ruins a hot shower faster than a snuffed out water heater pilot light, Brrrr! We will show you how to safely get your water heater fired up again!
How To Fix A Leaking Hose Bib
Don't let a leaky hose bib ruin your summer. We will show you how to fix your outdoor faucets so you can get back to having fun in the sun!
How To Easily Fix A Wobbling Toilet
Rocking or wobbling toilets can be a home owner’s worst nightmare. We will show you how to quickly stabilize your toilet, rock on!
How To Stop Your Water Heater From Making Scary Noises
Find out how to silence your water heater once and for all with our guide. Learn how to quite your water heater noises all by yourself!
How To Install A Toilet
Installing a toilet might seem like a daunting DIY project, but it's really quite simple. Our guide will have you flushing a new toilet fast!